
As many will know, tandoor ovens are traditional clay ovens
that have been used for millennia in much of the world. They are cylindrical in shape,
often tapering and/or curving inward at the top to promote maximal heating.
Food is cooked on metal skewers which dangle over the open wood fire built at
the bottom of the cylinder. A hole at the bottom acts as an air intake,
allowing the tandoor to behave like a giant chimney. The heat of the tandoor is
absorbed and radiated by the clay, creating
an even cooking heat and searing in juices while the hot metal skewers cook
food from the inside out. Juices and fats drip on to the fire to create a
uniquely delicious smokey taste.
After building our cob pizza oven and
getting so much use out of it, we wanted to try using cob to build a tandoor. However, after much internet searching we were unable to find any information on how to
do this. As such, we have pioneered our own adaption of one and it has worked out
wonderfully. Here is how we built it. Hopefully some of you are inspired to build a cob tandoor of your
own.
Or maybe you already have one and will be inspired to share your own
experiences.
To begin with we needed a plan. We sketched
out many different designs and ultimately settled on the one shown below. Our
tandoor would be conical in shape, tapering and curving in at the top. It would
have a rock foundation and a dense
fire brick bottom insulated from below with wood ash and glass bottles. In BC’s
lower mainland, dense fire bricks can be bought from Clayburn Industries in
Abbotsford. Well worth the expense! The walls would be built in 2 layers using
two different mixes of cob. The dimensions were chosen for aesthetic reasons
and based on what we thought would make for a comfortable working size and
shape. You can make your oven any number
of ways. This is just the system that we came up with for ours.

A site for the oven was chosen. Ours is
right next to our pizza oven in the back yard so we can have combined tandoor
and pizza nights. A trench was dug, roughly 8 inches wide and 12 inches deep in
a round of ~3’ in outer diameter. It was then packed with chips and dust and
tamped down. This foundation will hopefully slow the rate at which our oven
sinks. You will need your trench to be below the frost line in your area.

Large rocks were arranged in a circle to
form the base. They just sit on the tamped trench and were arranged to create a
tight fit that looked nice. Gaps between the rocks can be filled with smaller
rocks if needed. The
inner diameter of the rock circle is probably about 30”. The inside of the
circle was filled with a few inches of wood ash from the pizza oven and some
beer bottles, all of which was then covered in a layer of dry sand.


DENSE
fire bricks were arranged and leveled on top of the
sand to form the bottom of the oven. These were tamped down to level in all
horizontal planes with the handle of a hammer to create a smooth, edge-free
oven bottom. This is where the fire will be built. To maximize the bottom area
of the oven within the constraints of the rock circle we had to cut some of the
bricks. We did this using an angle grinder fitted with a hard stone cutting
wheel. We decided to use dense, rather than porous, bricks because we thought
they might retain more heat and allow the oven to remain hotter longer once the
fire died out.
 |
| Firebrick base under construction |
We wanted to use a sand form around which
to build the tandoor, much like how a cob pizza oven is built. However, we were
unable to create one in the shape and size that we wanted because it kept
collapsing. Presumably this is possible, but we didn’t know how to do it. To
get around this we made a card-stock form that would contain the sand
in the shape we wanted.
We used an online cone calculator to work
out the flat shape of the inner straight walled part of the cone of the oven. Our
cone had a base 24” in diameter, a top of 20” in diameter, and a height of 20”.
Using the online pattern we fashioned a cone out of heavy card stock from the
art shop and centered it on the brick base.

We initially tried to fill the cone with
damp packed sand but the form tragically exploded, tearing the cardstock to
shreds. Turns out the card stock was not strong enough to withstand the
pressure and moisture of all the sand.
We made a second cone and this time only
filled it about 6” full of moist packed sand before we started cobbing. The
inner layer of cob was fire cob. Our mix consisted of 1 part clay rich soil
(Burkeville Ready-Mix left over from building the pizza oven) to 4 parts coarse
sand. This was combined with water by stomping and rolling it on a tarp to make
a coarse, crumbly mix that could be packed with force in to strong balls. This
mix has no straw or animal hair in it. It is in direct contact with the fire
and has nothing flammable in it. We then began cobbing, working around the base
of the oven to the height of the sand before adding another 6” or so of packed
sand and then continuing to work up with the cob . As with the pizza oven this
cob was very gritty and required a lot of force of get a good pack. In this way we worked our way to the top of
the cone form.

When our cob was about 6” from the top of
the cone, we filled the cone to the top with packed sand and then continued to
build the sand form up over the top of the cone to create a rounded dome with a
radius of roughly 10”.


The sand dome was covered in wet newspaper
to prevent the cob from sticking to it and the cob was built up and over to
completely close over the top of the cone.

Our cob was a little too wet and because of this we had problems with it slumping down the side of the oven. Once the top was completely cobbed over it looked like a saggy blob but we shaved off the sides with an old wood saw to get a clean even shape that we were happy with.

We wrapped our oven up in a tarp and left it to sit overnight. The next day the cob had locked up somewhat so we cut the openings. To get a level, centered top we placed a 5 gallon bucket over top of the oven and used a bubble level to set it perfectly. We used an old kitchen knife to trace around the edge of the bucket, marking out the line and then sliced off the top of the dome with horizontal cuts, following this line. We also cut the lower hole which acts as a fire feed and air intake. To do this we used a flower pot to trace a perfect circle at the base of the oven where we wanted our opening and again used the knife to cut the hole.

We left the oven tarped for another couple of weeks before taking out the sand. Once the sand was out we peeled out the card-stock and left it another week or two before lighting a fire in it.


We wanted to try cooking breads on the curved inner top of the oven but found the inner fire cob to be too rough. To overcome this we plastered the inside with a fine fire cob plaster prior to the first firing. We took some pure lumps of clay, ran them through a fine sieve to get out the grit and then added 4-5 parts of sand sifted through fine window screen. This created a silky plaster that we applied with our hands to the inside of the oven after moistening it well with water. It resulted in a smooth, even interior finish. We used polished stones, the lids of plastic yogurt containers, and damp sponges to smooth the clay plaster into an even pearly surface. So far it has worked great though we still need more practice getting the bread off the oven without dropping it in to the fire!
Having never used a tandoor prior to building this one, we were not aware of the process of curing the oven before the first firing. We have since read extensively on this process and intend to attempt curing our next tandoor after smoothing the inside and before first firing it. Presumably this will allow us to manage cooking the breads better.
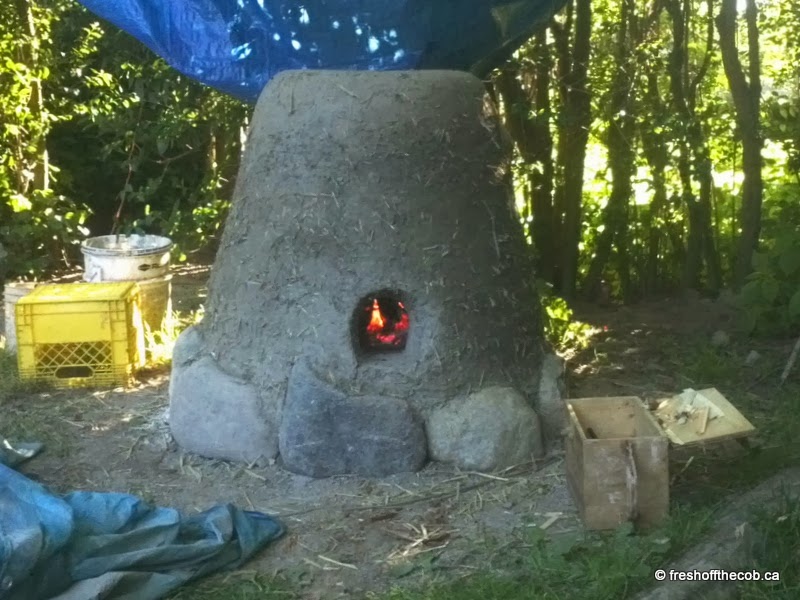
When we first lit a fire we were astonished
by how quickly and efficiently it heated up. We half expected it to collapse
but it didn’t even crack. We used dry wood bucked in to fairly small pieces
(4-5” in diameter, 12” long) to make the fire. It was cotton wood season when
we first lit the oven and we could see the fluff in the air getting helplessly sucked
in to the air intake. We couldn’t hold our hands even a foot over the
opening without getting burned. It worked amazingly well!
We initially only had a set of useless
little skewers on which to cook food but they ended up working quite well.
Because of the design of our oven we found it easier to suspend the skewers
from a metal bar resting over the top opening such that our food dangled over
the fire rather than resting on the bottom and leaning on the sides. We also found that the food cooked faster when
it was dangled close to the walls and that the side facing the wall cooked much
faster than the side open to the fire in the centre. We used potato slices on
the end of the skewers to prevent scorching of the food. To prevent the food
from slipping off the skewers, we simply bent the ends over at 90 degrees about
an inch from the tip.
 |
A trial cook shortly after first firing the tandoor Paneer, zucchini,and mushrooms |
The first food that we cooked was unbelievably
delicious. It cooked surprisingly quickly and was smokey and juicy. We have since cooked countless dishes
including tandoori chicken, marinated beef, Moroccan style ground beef skewers,
veggies of all types, and roasted paneer. Whole garlic cloves, whole shallots, and chunks of carrots and yams coated in olive oil are particularly
delicious. Despite all the fancy recipes we’ve tried to date however, the
indisputable favorite remains plain old chicken legs seasoned with nothing but
a bit of olive oil, salt and pepper; an indescribably delicious recipe that we
borrowed from our good friends JB and Robin. When cooked on the tandoor the meat
falls off the bone and melts in your mouth.
 |
| Salt and pepper chicken with roast winter veggies |
As difficult as it was to stop using the
Tandoor for a few weeks, we decided to add a second layer of cob to try to
improve its heat insulation. This cob was made using 1 part
Burkeville-Ready-Mix, 1 part sand, and copious amounts of straw and wood
shavings to make an airy mix of mostly straw glued together with just enough
clay to stick it all together. The fire cob core was wetted with the hose and
the insulation layer was applied. We left it to set for a couple of weeks,
wrapped in a tarp before firing the oven again. Letting cob set slowly
apparently helps prevents cracking and creates a stronger end result. We have since realized that this layer doesn't insulate so much as add thermal mass to the oven that allows it to adsorb more heat and hence cool more slowly.

 |
| Top finished in cute roundy edge |
We purchased extra long flat skewers which work far better than our initial little skewers. We can get much more
food in to the oven this way and the meat cooks faster. To prevent the food
from slipping off the end we drilled a tiny hole in the tip of each skewer.
Through this hole we use a little turkey dressing skewer to pin the sacrificial
potato on the end, preventing food slippage. Not terribly conventional but it
works great!
 |
| Veggies, bacon, salt and pepper chicken |


As a final touch to our oven we plastered it to both decorate it and help protect it from weathering in the rain. We first applied a coarse scratch coat which we made by combining 1 part NHL2 lime with 4 parts coarse sand. To this we added copious amounts of straw that we chopped in to short segments by putting it in a garbage can and then going at it with a weed whacker. The oven was dampened with water and the scratch coat was applied in an even but coarse layer. Wear GLOVES when working with lime!

 |
| Fraser supervised much of the construction |
The finishing coat was made from 1 part NHL2 lime and 2 parts sharp masonry sand which we sifted through fine window screen. To this we added a liberal amount of horse fur that had been previously washed, dried, and carded. We noticed that our trials of plaster that had horse hair in the mix cracked significantly less than equivalent plasters without horse hair. The hair did nothing to alter the final finish of the plaster, it completely disappeared from view. We tinted this layer with pigment which we purchased on line from EarthPigments.com. To get good coverage of our tandoor we used 1kg of tint for the darker areas, and roughly 500g of tint for the yellow band. Our colours are Envirinox Dark Brown, and Curry Yellow. We finished our plaster layer with a tadelakt technique which we describe fully in our fireplace blog.


We left the plaster for several weeks
without firing it in an effort to prevent the plaster cracking with heating
however even with this it still developed a fine crack the runs the height of
the oven that we will need to repair in the spring.
Our tandoor oven has seen lots of use since
it was first built in April 2013. We have even continued cooking on it through the cold
winter months as it heats up quickly, cooks food fast, and provides a nice
warmth to gather around while dinner is cooking. We are very happy with how it
has turned out and have had tonnes of fun cooking over it. Hopefully some of
you are inspired to build one of your own.
 |
| The tadelakt finish has a gorgeous shine to it |
This tandoor was built in part by the
wealth of information available in the following books:
- Building with Cob: A step by step guide Adam Weismannn & Katy Bryce
- Tadelakt Michael Johannes Ochs (the most comprehensive book on tadelakt I have found)
- Using Natural Finishes Adam Weismannn & Katy Bryce


Absolutely fantastic ! Cob on a tandoor? Genius! How do the naan breads turn out ?
ReplyDeleteHi
DeleteWe've done naans a few times. Sometimes they work, other times not but I think that has more to do with my technique than the oven. When they work, they are divine. When they fail, it's because they fell in to the fire or stuck irreparably to the side.
Meat and veggies off this oven are delicious!
I've moved your comment over the our other domain, www.freshoffthecob.ca. Please feel free to visit us there.